Soon I will be moving all the way across the country to join this little pickles daddy in Perth to start setting up our new home. With a new baby on the way we wanted to make the most out of the things we already have, and anything that we can buy second hand and make over.
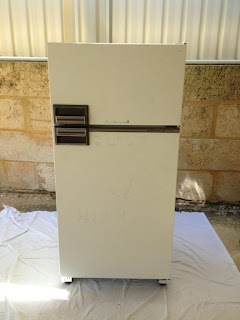
Daniel has an old fridge that is currently being used as the beer fridge in the man pad. It was covered in texta drawings and a little shabby but otherwise it works just fine. Inspiration came to me while browsing Pintrest one day, somebody had painted their fridge with chalk board paint! Fantastic! We did a bit of research and read a few tutorials before Setting out on our own fridge painting adventure. (Well Daniel had the adventure, I just project managed from across the country!)
Here is the tutorial put together by Daniel.
Here is the fridge to start with (with most of the texta and stickers scrubbed off)
Here is everything we used to get the job done:
Painters tray
10mm foam roller (2)
Rust Oleum Magnetic Primer
Rust Oleum Chalkboard Paint
Mold and Mildew Cleaner
Painters tape (We used Frog Tape)
Chalk (eventually)
Right Angled Paint brushes or foam brushes
10mm foam roller (2)
Rust Oleum Magnetic Primer
Rust Oleum Chalkboard Paint
Mold and Mildew Cleaner
Painters tape (We used Frog Tape)
Chalk (eventually)
Right Angled Paint brushes or foam brushes
Clean out the inside of your fridge, empty it and leave it to defrost
completely (if necessary) and once it's done, dry the interior, getting rid of
any condensation or moisture.
Hint: If you only have one fridge you might need
to borrow some eskis for the weekend or eat out.
Then move your fridge outside so that it is well ventilated for when you
are painting. Set it down on a drop sheet to catch all the spills you WILL
make.
Now get to cleaning the outside of your fridge, if you're getting your
fridge of a bunch of boys it will be ancient and have stickers all over it along with some graffiti and
profanity haha! Use a wall paper scraper for the stickers and a coarse sponge to
pull up any residue that is left there. Once your fridge is scrubbed clean I
suggest going over it with mildew and mold cleaner on the outside to make sure
you're working with a clean surface.
Sand the surface for about 15-20 minutes all over, to rough up the fridge ready for the primer
Next up, start taping up your fridge where you don't want stuff to be
painted over, like the rubber seals, handle and hinges.
Hint: instead of using 1
long piece of tape to do the seals, use smaller bits, about 20cm long, otherwise
you'll notice after the first coat of paint, it will slowly come unstuck, and
using smaller strips helps avoid this.
Once you've taped off everything you don't want to get painted you are ready to start with the primer! We used Rust-Oleum Magnetic primer for this
This stuff will help your fridge magnets stick to your fridge once you're
finished (because we can't just throw away all the magnets we have collected
over the years)
When you're using this stuff, make sure you've got all the appropriate
protection gear, gloves goggles etc, you don't want this stuff getting into your
eyes.
You'll need to shake the tin up before using it, then you'll need to shake
it again and again. Then open it and stir the contents. It will feel like there
is sand at the bottom of the paint tin, you just need to mix all that stuff
through the liquid that's sitting on the top. I would stir for about 3 minutes,
then put the lid on and shake it up again, then repeated that about 5 times
before I had a constant texture.
Once that' is all stirred up good you can begin painting your fridge. You
want to do at least 2 coats to make sure you get your fridge covered. We did
3. You only need to wait 30 minutes between coats and then we waited 3 hours
before going on with the chalkboard paint. The paint will be very coarse if you
haven't mixed it properly and you will find that you need to use light strokes on
the fridge otherwise you'll put too much primer on the fridge.
After first coat of primer
Once you've applied the final coat of primer you can start on the
chalkboard paint about 3 hours later. This stuff will roll on quite easily
compared to the primer and you won't need so much on your roller to do so. Now
because both of these paints are black it's sometimes hard to tell where you've
painted and where you haven't, so use a particular order when painting your
fridge so you don't end up missing spots. I went left side, right side, top,
front then the inside.
You'll need to wait 4 hours between coats for the chalkboard paint, for a total of 3 coats. Once you've finished, leave it for 3 days then you will have to 'season' your chalkboard fridge. Using the side of a piece of chalk cover your whole fridge, then dust off and you're ready to go making pretty little pictures and lists.
After last coat of chalk paint
I will post a picture of the completed fridge once we have it into our new place in a few weeks and looking good!


No comments:
Post a Comment